I of course use a Bubba to store all my precious data which in turn is backed up off-site using rdiff-backup. Rdiff-backup gives me the best of two worlds synchronization, giving me direct access to the files in the remote backup, and incremental backup, giving me the history of my files as well. But this is material for a completely separate article.
But for some reason I’m not completely comfortable with mounting the Bubba share on my Linux desktop computer for more write intensive operation such as my home folder. This most likely due to me starting with the B1 & B2 which hadn’t that computing power of the B3. I nfs mount the complete storage share at the same desktop computer to give me instant access to my media files and other stuff.
All this is perfect but I almost always end up with a non backed up Documents folder containing a lot of important documents that I then tried to manually synchronize with my storage Bubba. Needless to say this is a recipe for failure.
Thus one day i stumbled upon lsyncd. This is a daemon that watches local directories for changes, waits for a predefined time for possibly further changes, and then synchronizes these changes to a remote location using one of many configurable methods.
I use this to launch when i log in to my Ubuntu Desktop and then monitor my Documents folder. When anything changes there it is automatically synchronized to my Bubba.
Build and install Lsyncd
Lsyncd is available from Ubuntu repositories but at least the one for Ubuntu 10.10, which i run is outdated. Thus i opted to compile it my self. I downloaded the latest release from here: http://code.google.com/p/lsyncd/downloads/list
Untar the downloaded source to a temporary directory using either the file manager, nautilus, or the command line.
Then start a shell, if not already running, and change into the directory created when unpacking the archive.
Issue configure to set up the build environment:
./configure
Then build the application by running:
make
This should hopefully complete without any errors. If not its most likely due to missing dependencies such as fx build-essential, liblua5.1-0-dev.
To finish it of and install the application run
sudo make install
Which will install the application to /usr/local.
Create configuration
From the same shell create a folder to keep your local configuration
mkdir $HOME/.lsyncd
Create the configuration file $HOME/.lsyncd/lsyncd.lua with for example gedit (run gedit $HOME/.lsyncd/lsyncd.lua) And enter something like this:
sync{
default.rsyncssh,
source=”/home/tor/Documents”,
host=”b3-server”,
targetdir=”/home/tor/Documents”
}
Where:
- default.rsyncssh tells lsyncd to use rsync over ssh. This makes it a bit easier because no rsyncd server has to be running on the other end.
- source is which directory to watch on the host computer.
- host is where on what machine to store the copy i.e. your Bubba.
- targetdir is the folder store the data.
Install startscript
To launch the lsync daemon I have modified a Debian SYSV initscript to check if there is a running instance of the daemon and if not start a new one.
It is available here. Download and copy it in to the $HOME/.lsyncd folder. Make sure it is executable by executing
chmod +x $HOME/.lsyncd/start_lsyncd.sh
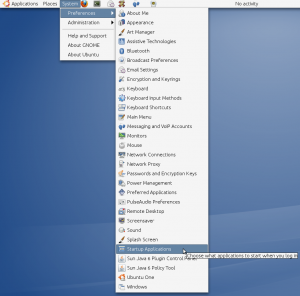
Then to make the script run at login, in Ubuntu 10.10 at least. Select the menu System->Preferences->Startup Applications
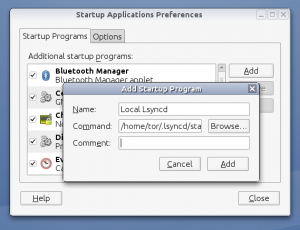
 Select Add, enter a name for the service and browse or enter the path to the start script. Click Add to complete the setup.
 Now whenever you login to your desktop the lsyncd daemon will be started if not already running.
Configure ssh
For all of the above to work you have to have a user account and shell access on the remote server. With that said the setup should work when you log in next time.
But to not have a password prompt pop up every time a file is changed in the Documents folder the best way is to generate and store a key on the server. Run
ssh-keygen -f $HOME/.ssh/lsyncd
Enter a secure password and confirm it by enter the same password.
Copy the key to the remote server
ssh-copy-id -i $HOME/.ssh/lsyncd.pub b3-server
Where b3-server is the hostname of the remote server.
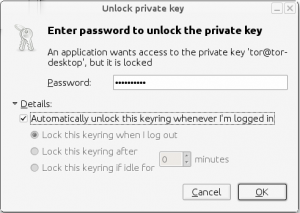
If you then use this key to try access the remote server via ssh you should get a dialog something like this
 Enter the password for the key and also select “Automatically unlock this keyring whenever I’m logged in” And click OK
Now hopefully everything should be in place.
Log out of your desktop and log in again. Create a new file in the Documents folder. Then verify that all files in the Documents folder on the remote server matches the one on your desktop. Also check that changes propagate correctly to the remote server.
If anything goes wrong start by checking that the daemon is actually running. (For example by running ps or check the System Monitor and the processes tab)
If the daemon is running check the log file /var/log/user.log for any clues on what goes wrong.

Excellent article Tor, thank you. Very useful and beautifully written too and I hope you will tackle rdiff-backup at some point as I have yet to get that going.
I have Windows desktops backing up to B3 and so far have failed to get rsyncd on B3 working for this, so I have ended up with a less neat but adequate solution of a job running on the desktop (Windows 7) that runs rsync to sync folders from desktop to /storage/mirrors/blah on B3. So I have a mirror of all my desktop files on B3 within an hour or so of any changes. Not ideal, but good, and I have a separate Windows backup to an external Seagate drive attached to the desktop, which gives me a separate archive. Again it is not ideal, but good enough for the time being.
I’d prefer to have B3 handling the archive backup and a more instantaneous mirror, as well as to set up off-site backup. For now my B3 is RAID, chained down (as is the desktop) and I hope the house never burns down! 🙂
Thanks again,
Mark